Melancholic, melodic house and techno continue to become a mainstay genre within dance music, and our newest pack “Aurora – Melodic Tech” can help you take on that signature sound.
Inspired by artists such as Kx5, John Summit, and Sofi Tukker, this new pack includes melodic synths loops, progressive basslines, and punchy drums made for creating deep, emotional, and melancholic house and techno productions.
Below are some practical production tips to help you take your melodic techno and house tracks to the next level.

Sound Pack Spotlight: Production Tips and Tricks
For Beginners:
Using arpeggiators.
Arpeggiators are a useful and practical tool to create rhythmic melody sequences within chord progressions easily. They can also act as a chord trigger or repeat tool.
Within Ableton, we recommend using the ‘Max for Live Arp’ device for maximum utility and flexibility. Insert a Max for Live Arp MIDI effect before your synthesizer, and dial in a sync, octave, and note pattern to create an arp sequence perfect for melodic techno and house music.
You can also try adjusting the velocity sliders (shown in the bottom green box) to omit notes from the sequence and customize your pattern even further. Don’t be afraid to experiment with different timings, patterns, and octave settings! Interesting results can be achieved with just a few tweaks.
Try it with tech house presets 🎛️

Next level: Intermediate
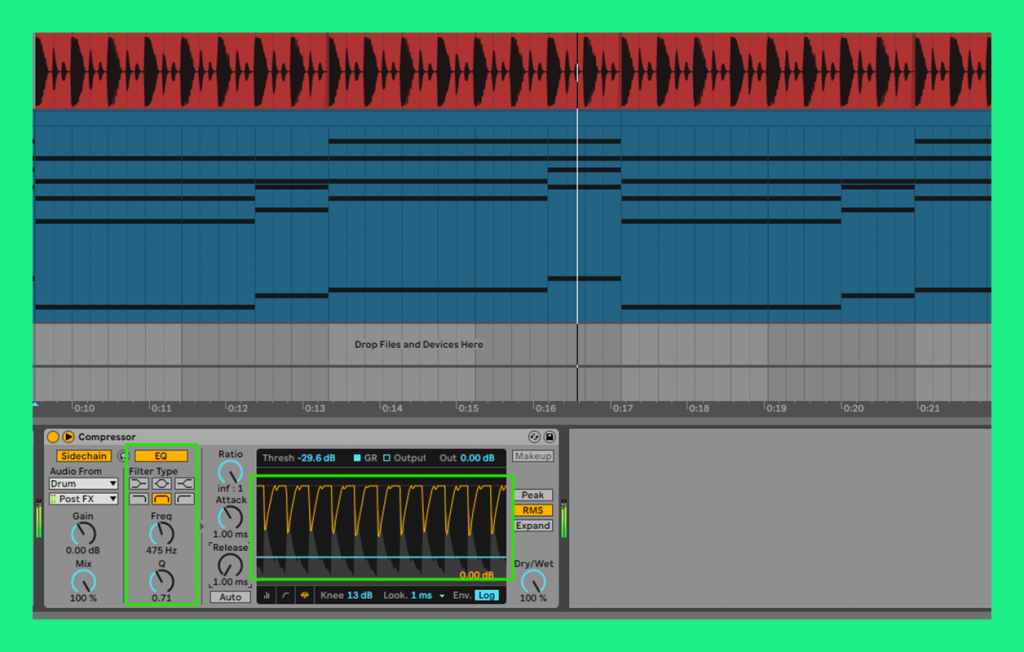
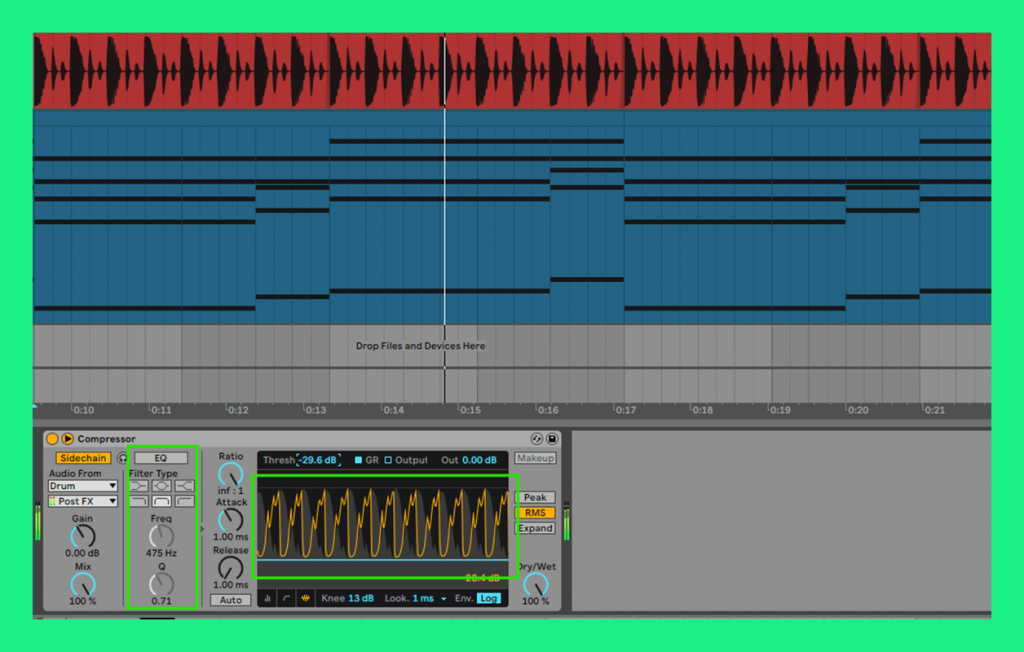
Clean kick sidechain using compression input EQ.
Using sidechain EQ to control which frequencies will trigger your sidechain can give you more control over your dance productions and can result in an overall cleaner, more professional-sounding mix!
When using sidechain input EQ, you choose which incoming frequencies will duck the affected audio. As seen in the screenshot, we use a bandpass frequency filter to select only the mid frequencies of the drum loop as input.
In house music (and most EDM genres in general), we typically want to achieve a sidechain effect that doesn’t pump too hard but is also noticeable and clean, meaning that the sidechain effect comes in quickly and also releases the audio in a quick and linear way.
In the EQ section of Ableton’s Compression device, adjust the frequency knob until your sidechain stops having a pumping effect and sounds cleaner. Also, check that the visual display of the sidechain shows a V-shaped dip. Doing this results in a quick and tighter-sounding soundchain.
Compare the visual displays above with and without the sidechain EQ enabled. Notice that on the device without sidechain EQ, the recovery line is not linear and the signal looks rounded at the bottom. Visually, this is what a pumping effect looks like. Sometimes this is desirable, but usually, it is done with intention and with volume-shaping plugins to get a cleaner sound. For the purposes of using a compressor device for our track’s sidechain, we are looking for a tight, clean, and punchy effect, and this sidechain EQ technique does exactly that.
For Advanced
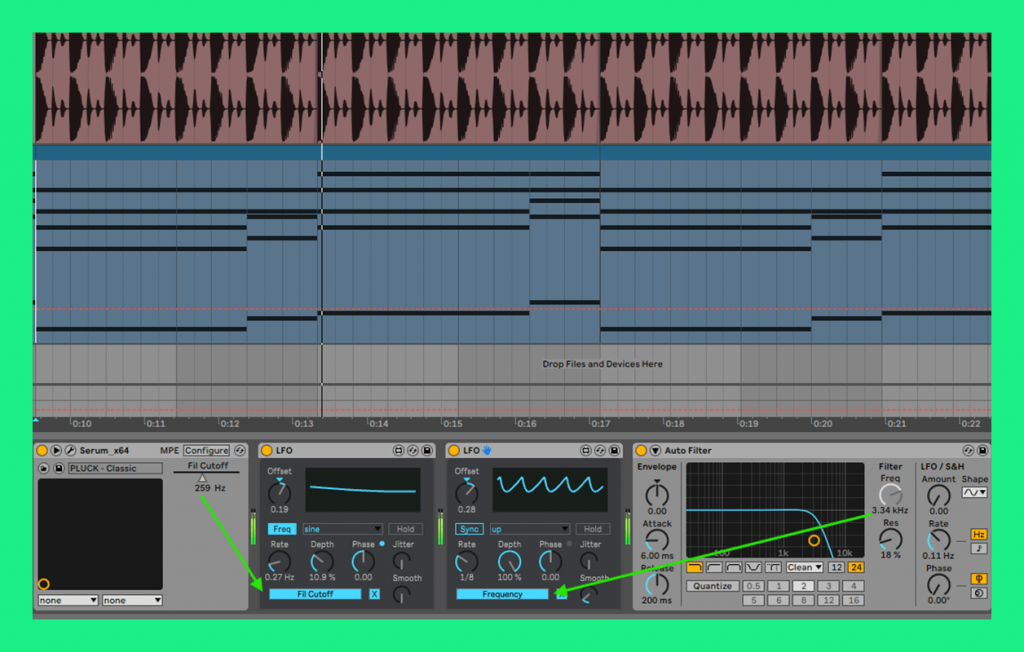
Mapping LFOs for complex and dynamic modulation.
Using two LFO envelopes to modulate the filter of a sound is a great way to introduce dynamics and complexity to a sound. Here we have two Max for Live LFO devices. The first LFO device in the chain is mapped to the Filter Cutoff knob of Serum and modulates a slow, unsynced rate sine wave to the sound. This will result in the filter gradually opening up and then closing over time. This LFO is also set to 10.9% depth so that the full effect is more subdued but still noticeable enough to add some movement and dynamics to the sound.
Next, we have an LFO device that is controlling the Frequency knob of the Auto Filter device and is modulating in a 1/8 synced rate on full depth and “up” mode. This will give a wobbly LFO effect to the sound. Although the depth knob is at 100%, it can also be set at a lower value, such as 50%, to blend it with the original pluck sound so that the LFO effect is not too overpowering. The offset knobs for both LFO devices are turned to the right to allow more high frequencies to pass through both LFOs. These offset knobs essentially act as frequency knobs and control the point of modulation once the LFO device is mapped to a parameter. By combining these two LFOs, we have added more depth and movement to our original sound. Try it out with leads, pads, or even vocal chops for some extra flare.
Check out a tech house toolkit 🛠️